Category: Guides

Ledge Options

When hanging on the edge, you have 5(+) options. Being aware of these options, while also the ones opponents may have a tendency to use, as well as how to counter these options can help you secure more kills and win more games.

  1. Regular Get-Up, usually followed by a shield or an attack (Control stick towards the stage)
    • The quickest option, and it grants invulnerability.
    • It is possible to shield instantly after getting up from the ledge, since shielding comes out on frame 1.
    • If a player gets up and shields a lot, run up and grab them.
    • If a player gets up and attacks a lot, run up, shield, then punish accordingly.
    • If a player gets up and attacks with their jab combo, learn their jab combo’s hitbox range, and punish with a move that avoids it.
  2. Attack (Pressing A or B)
    • Aggressive players may rely on this option more than others, which isn’t a good habit, since it is the most punishable option.
    • Running up and shielding in front of the attack, then using any attack or grab are great counters to this option.
  3. Jump (Pressing Jump or Up on the Control stick)
    • Shorthopping above the ledge and throwing out a Dair or any aerial attack is a good counter to this option.
  4. Roll (Pressing Shield)
    • Long invulnerability frames.
    • Figure out where the character will end up after the roll, and charge a smash attack on that position.
  5. Drop-off… (Control stick away from stage)
    1. Jump back up and attack
      • Shield, then punish accordingly.
    2. Jump and airdodge onto the stage
      • Airdodges have a lot of landing lag, so charging a smash attack to outlast their invulnerability is a great counter.
    3. Jump and avoid opponent
      • Follow them and attack them, or wait for their airdodge!
    4. Jump and counter, etc.


This is a simple overview of ledge options, by dropping off, opponents may do a variety of things that I haven’t covered. This is where it is up to YOU to observe!

Good Luck!

– parson

Legal Stages / Stage Picking

Although tournament rules may vary depending on the decision of the Tournament Organizer (TO), these are the rulings that are most commonly accepted.

Starter Stages:

  • Battlefield (Miiverse)
  • Final Destination (Omega Stages)
  • Lylat Cruise
  • Town and City
  • Smashville

Counterpick Stages:

  • Duck Hunt
  • Dreamland 64

Stage Picking:

In a tournament setting, games are either best 2 out of 3, or best 3 out of 5, and the order for gameplay is as follows.

  1. Rock-Paper-Scissors (best of 1) is played to see who picks the first stage.
  2. The loser of Rock-Paper-Scissors chooses one stage from the starter stages to strike (ban).
  3. Winner of Rock-Paper-Scissors chooses from any starter stage still available.
  4. Play Game 1, Winner picks a stage to strike, and Loser chooses from the available stages.
  5. Play Game 2, if there is a Game 3, Winner strikes and Loser picks. Players may not pick a stage they have previously won on, unless mutually agreed to by both players.

That’s all for now – I’ve been low on content lately since I recently moved and have not had Wi-Fi for a while. More content is on the way though!

– parson

[1.1.6] A Step-By-Step Guide to Mod Smash 4

What? Smash 4 mods? If you have not been up to date in the smash community as of late, then you likely are unaware of this actually fairly simple process!

All the information can be found here, but I felt the reformat and explanations will make it easier for everyone to understand.

Let’s jump in.


Requirements:

Process:

Setup:

  1. Install Xampp
  2. Extract “curious file.zip”
  3. Place the two folders “kernel” and “sdcafiine” from the curious file into
    • Windows: C:\xampp\htdocs\
    • Mac: Applications\Xampp\htdocs
  4. Make sure Skype is not running, or other programs that use port 80 (Windows)
  5. Run the Xampp control panel, next to Apache, click “Start” (Mac, click “Manage Servers”)

Choosing Mods:

Custom Music:

  1. On the root of your SD card, make a folder named based on your region:

    US – 0005000010144F00

    EU – 0005000010145000

    JP – 0005000010110E00

  2. Inside this folder, make a folder called “sound”
  3. Inside this “sound” folder, make a folder called “bgm”
    (you should have a path like: “SD:\0005000010144F00\sound\bgm”)
  4. Visit Smash Custom Music and select a song from their variety of game soundtracks!
  5. When you find a song, on the page of the song, click “Download or add to template for”, then “Super Smash Bros. for Wii U”
  6. Choose a stage and music slot you want this new song to replace
    (When you run the game, it will not edit the displayed name of the track, but only the music itself)
  7. Click “Download NUS3BANK”
  8. Place the downloaded NUS3BANK file into the bgm folder on your SD card
  9. You can repeat steps 5 through 8 to replace as many songs as you’d like!

That Ridiculous Mod Pack I see Streamers Playing:

NOTE: As of now this pack has an outdated 1.1.5 Bayonetta (with extra features, of course).

This mod pack features many strange alterations, and since it is fun to discover what things have been changed, I will provide a short list of some of the fun features I found while experimenting further below, to prevent spoilers. Also note: there are definitely more that I haven’t discovered!

  1. Download the appropriate pack from one of these links: [1.1.6] (US – Download  | EU – Download)
  2. Extract the pack from the zip file
  3. Place the numbered folder at the root of your SD card
    (The US directory should look something like: “SD:\0005000010144F00\patch\patchlist”)

Loading Mods (Wii U):

Once Xampp is running and the Apache has been started…

  1. Open the internet browser on the Wii U
  2. Open your bookmarks
  3. Edit one of the bookmarks, or add a new one to look like this:
    Name:     Kernel
    Address:  http://<your internal ip from earlier>/kernel/blarg.php
    (Example: http://192.168.1.64/kernel/blarg.php)
  4. Add another to look like this:
    Name:     SDCafiine
    Address:  http://<your internal ip from earlier>/sdcafiine/blarg.php
    (Example: http://192.168.1.64/sdcafiine/blarg.php)
  5. Open the bookmark named “Kernel”
  6. DO NOT PANIC! The screen will go green and an illuminati symbol will appear, simply wait for the console to return to the home menu
  7. Open the internet browser again and click bookmark called “SDCafiine”
  8. A coffee cup will appear, press A and wait for the console to return to the home menu again
  9. Press home to return to the Wii U menu
  10. Boot Super Smash Bros. for Wii U
    Note: This process is for the initial startup. After this has been done, to run the same mods in the future, all you need to run is the “Kernel” bookmark, then boot Smash. So unless you have altered the SD card directory, there is no need to run SDCafiine.

Discovered Features:

stock_90_falco_01

Falco has been shifted to more resemble his Melee incarnation, boasting his Shine once again. Many of his moves have reduced endlag, namely his aerials and his laser. Very fun to experiment around with. It also seems as if his hitstun is more resemblant of Melee as well, with different angles.

stock_90_ganon_01

Ganondorf has inherited his own Witch Time, activated by taunting. The opponent is left helpless in extremely slow hitstun, allowing you to chain a bunch of fun moves together. Most of his moves have decreased endlag as well, making Ganon simply a monster.

stock_90_wario_01

Wario has been transformed into a full-time Wario Man. Boasting powerful, extremely fast moves with little to no endlag, while his aerials also give him a little upwards vertical movement. His Jab combo can allow him to travel across the stage.

stock_90_mario_01

Mario’s Utilt is unchanged. His Usmash has been given even less endlag, while his F.L.U.D.D. gimps extremely easily. His fireballs also have strange altered knockback. He can jump almost forever as well.

stock_90_palutena_01

Many of Palutena’s startup lag on her moves were decreased, making her much faster.

stock_90_lizardon_01

Charizard’s jump height was increased, and he now has a third jump, which puts him in a strange standing position.

stock_90_pacman_01

Pac-Man is green.

stock_90_ryu_01

Ryu has massively reduced endlag on a lot of his moves as well, making him a crazy character, that’s very fun to play.

stock_90_mewtwo_01

Mewtwo can use his Up-B indefinitely, and it has very little endlag.

stock_90_zelda_01

Zelda’s Side-B has vastly increased knockback.

stock_90_gamewatch_01

Mr. Game and Watch now has a 100% chance of pulling a 9 out of his hammer. It also hits you no matter where you are on stage.

stock_90_lucas_01

Lucas is now a slippery Ness, like Luigi compared to Mario. He can spew PK Fire as well.

stock_90_marth_01

Marth’s Dancing Blade now has a diagonal recovering angle. His Uthrow also kills.

stock_90_ness_01

Ness’s Bthrow remains unchanged (joke), and he can really dish out PK Fires.

stock_90_koopa_01

Doing Bowser’s Up Taunt will briefly transform you into Giga Bowser. Fire breath is also a R.O.B. laser-esque projectile.

stock_90_purin_01

Jigglypuff’s Rest launches sideways instead of upwards, reminiscent of her Melee form.

stock_90_luigi_01

Performing a Side-B Missle will always result in a misfire.

stock_90_ike_01

Ike’s Uair will act as a helicopter, letting him rise in the air a little.


Happy Modding 🙂

– parson

8 Intermeditate Techniques to Improve Your Sm4sh Game

Trying to improve your smash game and aren’t sure how to take your game to the next level?

These techniques should be practiced only once you know and can apply the basics of Shields, Attacks, Grabs, Dodges, and can recover proficiently. If that is the case, read on!

Here are a few techniques that you should keep in mind when trying to improve your smash game. Listed in order of how you should introduce yourself and practice these techniques.

At first, it may be difficult to change any muscle-memory that you have learned from playing the game, but it doesn’t take too long to overwrite that! Eventually, try to implement them into your gameplay. It may be slow starting off, but as you practice, you will definitely notice the payoff.

If you are unsure of any of the terminology used, reference this post!

Short Hop: Tapping your jump button lightly will perform a short hop.  This is useful to use attacks on standing characters. It is less punishable than a Full Hop, since you are in the air for a shorter amount of time.

Shieldgrab: Pressing Attack while in shield initiates a grab. This is very useful if your opponent incorrectly spaces their attack, and hits your shield too closely.

Fast Fall: Tapping the control stick downwards while airborne will cause your character to fall faster, a good technique to get back to the stage quicker, close gaps on your opponent quicker, and essentially speed up your entire gameplay.

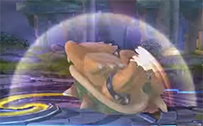
Tech: Whenever you are in a tumble animation, if you press Shield as you hit the stage, you can speed up the time it takes you to stand back up (or roll!), while also granting you invulnerability frames. This is called a Tech. This technique is also used offstage, when a character is hit into the stage, the character can Tech off of the wall to prevent them from being spiked into infinity.

bowser-tech.png
Bowser: On-Stage Tech

B-Reverse: Right after using any Special Move, if you input the opposite direction your character was facing quick enough, it will flip your character around. Good for mixups, and adds momentum to your character, which is situationally useful.

Jump-Cancelled Usmash: While running, if you press jump right before you input an Up Smash, you will cancel your run and your jump and slide a little during your Usmash. Length of the slide varies by character. Also a great Out of Shield option (depending on the character’s Usmash), because jumping out of a shield and canceling it with an Usmash requires quite a few less frames than dropping your shield, and Usmashing (this will be further explained in another post, perhaps with a video).

Pivoting: Turning around before using a move. Useful for grabbing, and other quick moves.

Perfect Shielding: Shielding exactly as you get hit will cause you to perform a Perfect Shield, and your shield will take no damage, and you will be able to react faster our of shield. The timing is difficult to get the hang of, but crucial at higher levels of play.


That’s all for now!

– parson

Mewtwo Resources

Mewtwo Resources

Although I’d like to write my own guide on Mewtwo (and I will someday!), I feel as if I would be reiterating things that have already been done well.  Here is a good list of resources on Mewtwo. As always, I’ll be updating as I come across them!

Control Setups

Smash 4 has an awesome feature in the form of control scheme customizations.  The most ideal settings are completely up to personal preference.  There are several options and there are advantages and disadvantages to each one.

I use a GameCube Controller, and since that’s what a good portion of the smash community uses, I will use that as the example. Other controllers are just as good, arguably.

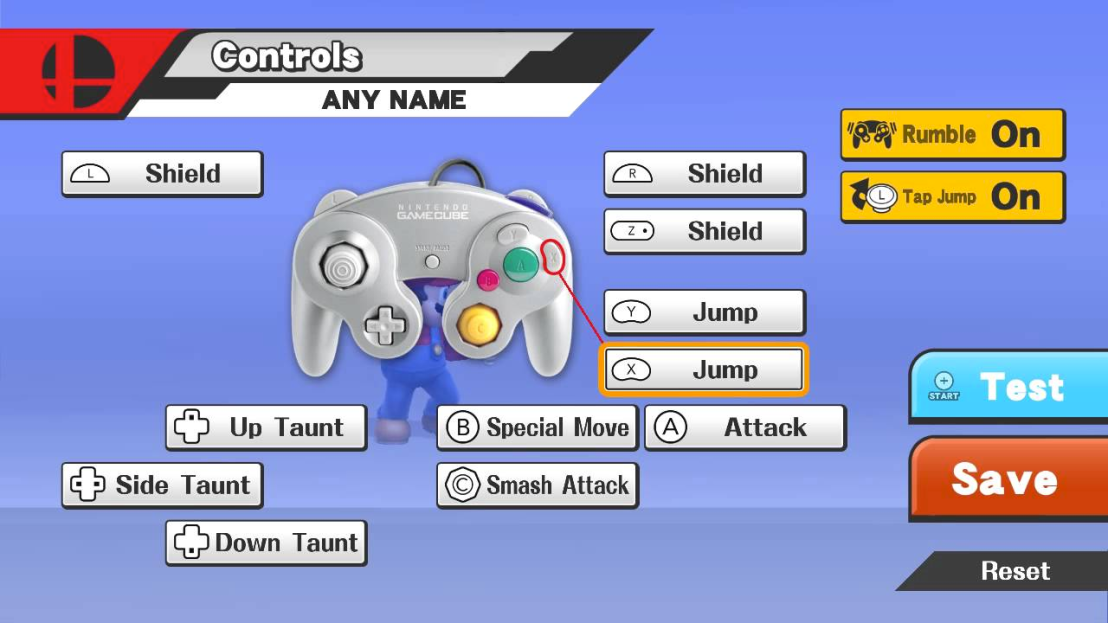
Let’s take a look at the custom control scheme screen:

controlscheme


There are many possible schemes, and ultimately it is up to you which one you pick, but there are specific changes that offer various benefits you may want to consider.

– Tap Jump: Tapping the control stick Up will cause you to jump.  Turning this feature off allows for easier usage of Utilts and Uairs.

– Rumble: Changing this feature will not affect anything other than whether your controller vibrates during play.

– A + B to Smash (Shake to Smash) (Not Pictured): By pressing A and B (or shaking your controller), it will Smash in the direction inputted on the Control Stick.

Common Tweaks to Default Settings:

  • C-Stick: Some players, including myself, do not rely on the C-Stick for smash attacks. Instead, changing it to Attack allows easier usage of Tilt attacks.
    • Some players may change this to Special Move, if they want an easier time doing a Downwards Afterburner Kicks as Bayonetta.
  • X/Y: Some players may decide to use one of these buttons as either a grab or a shield.
    • This is useful if you like controlling these actions with your thumb.
  • L/R: A few characters may benefit from using either L or R as a Jump instead of shield.
    • This makes Short Hop aerials very easy to do.
    • Doing this also may benefit characters that need to attack instantly out of jump, suck as Sonic or Villager, or potentially anyone if the situation applies.

Vastly Alternate Schemes:

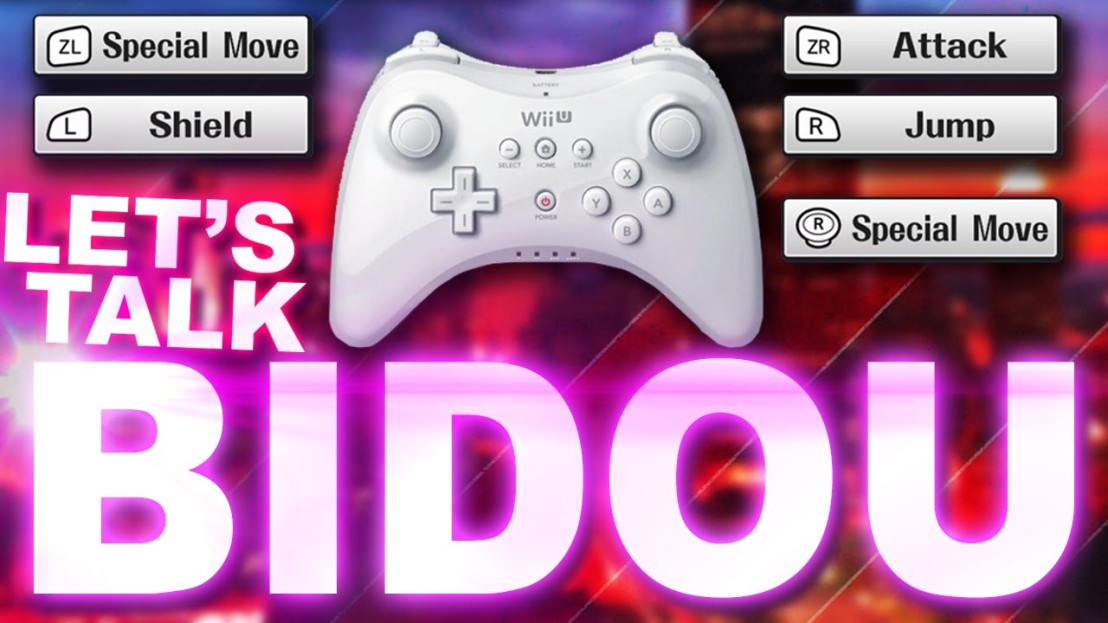
  • Bidou: Typically done with a Wii U Pro Controller, as it has four shoulder buttons (it can be done on the GameCube Controller, but the technique is more difficult to master since the right thumb would have to travel between the C-stick and the A, B, X, & Y buttons very quickly). This setup is done by changing the ZL button to Special Move, ZR button to Attack, R button to Jump, and the Right Stick to Special Move as well.  This scheme relies on the ZL button being pressed to hold a special move input, while the Right Stick is used to allow simple pivoting and control of the character. Some techniques are made a lot easier with the use of Bidou, but the task of changing your control schemes and rewriting that muscle memory may make this scheme more trouble than it may be worth. But don’t take my word for it! ZeRo does a fantastic job further explaining this concept in this video:

bidouzerovideo


That’s all for now – as I come across more controller setups, I’ll be sure to update this post!

– parson

Sm4sh Lingo

Hey guys, it’s parson!  Whether you’re new to the smash scene, or you are a returning player from older games in the smash series, there are a lot of jargon that may go over your head.  Hopefully this guide clears some of that up.

A reminder that nothing on this blog is static, I will always be updating these guides and adding terms and explanations as I come across ones I may have forgotten.

I will also further explain a lot of these terms in future posts!

That being said, let’s jump in-


Standard Jargon

Standard Attacks/Moves

  • Jab (1, 2 3, Infinite): Standing attack combo. (A,A,A).
  • Utilt, Ftilt, Dtilt: Up Tilt, Forward Tilt, Down Tilt (A+ slight use of the Control Stick).
  • Nair, Fair, Bair, Dair, Uair, Zair: Neutral Air, Forward Air, Back Air, Down Air, Up Air, Grab in Air (while airborne, A alone for Nair, Z alone for Zair, with Control Stick for the rest).
  • DA: Dash Attack (While dashing with the Control Stick, use A or the C-Stick).
  • Usmash, Fsmash, Dsmash: Up Smash, Forward Smash, Down Smash. Can be charged! (+ Control Stick or C-Stick)
  • Up-B, Side-B, Down-B, Neutral-B: Self explanatory, I hope! (B + direction on Control Stick)
  • Grab: Exactly what you think.  Counters Shields. (Z or L/R A).
  • Pummel: When grabbed, press A or Z to deal a little damage.
  • Fthrow, Dthrow, Bthrow, Uthrow: Forward Throw, Down Throw, Back Throw, Up Throw. After a grab, throw someone with the Control Stick.
  • Roll: Dodges to the left or right, with moments of invulnerability (L/R + left or right on the Control Stick).
  • Spotdodge: A dodge in place. Makes you invulnerable for the duration of the dodge (L/R + down on the Control Stick).
  • Airdodge: A dodge in the air. Makes you invulnerable for the duration of the dodge, but has landing lag if used above the ground (while airborne, press L/R).
  • Shield: Protects from attacks. (L/R). You can position it by slightly moving (Control Stick).

Techniques and Terms

  • Short Hop (SH): exactly what it sounds like.  Performed by lightly tapping the jump (X, Y, or tapping the Control Stick upwards lightly!) button (yes, it CAN be done with Tap Jump!), your character will jump about half the height as they would with a Full Hop.  Useful for using aerials on a standing character.
  • Full Hop (FH): a regular jump.
  • Fast Fall (FF): When airborne, tapping and holding the Control Stick downwards will initiate a fast-fall.  All characters have different fast-fall speeds. Fast falling is a great way to regain stage control.
  • Footstool: Jumping while on another character initiates a footstool, sending them downwards. Cannot be Teched (see below) on stage.
  • Knockback: Can refer to a few things.  A move’s Knockback determines how far a character is sent, while Knockback Angle determines what direction they will go. All characters have different amounts of knockback and unique knockback angles with each of their respective moves.
  • Meteor Smash/Spike: Usually done with a character’s Dair, a spike is performed by knocking the opponent off of the bottom of the screen with an attack. A Meteor Effect is when a move has a knockback angle that aims downwards.  Many moves have a meteor effect, let it be slight or extreme.
  • Frame: can refer to a few things.  First off, there are 60 frames every second.  This is used as a unit of measure with various actions, such as attacking, or shielding.  Each character has unique Frame Data for their set of moves (eg: Fox’s Grab initiates at frame 6 and is active until frame 7), while some actions have the same speed across every character (eg: Shielding comes out at frame 1).
  • Patch: An update to the game.  Currently the game is version 1.1.5.
  • Nerf & Buff: Two antonyms.  These are in reference to how characters change between patches.  A nerf is a change that affects the character negatively, while a buff benefits them.
  • Input: When the game registers a button press.
  • Button Mashing: When Grabbed, or trapped in a move like Lucas’ PK Freeze or Yoshi’s Egg, you can minimize the amount of time you are locked into these moves by registering a lot of inputs, or Button Mashing.
  • Stale: Moves become weaker with repeated use, reducing their knockback and damage output slightly with each use.
  • Shield Break: When your shield depletes, you are put in a daze for a while.  The time you are stunned depends on how much % you have accumulated, and how fast you mash buttons.  Jigglypuff, however, dies instantly if you break her shield. How tragic.
  • Stage Control: Exactly what it sounds like. Maintaining control of the stage is a crucial part of any character’s strategy. Gives you an advantage because you are on solid ground.
  • Blast Zones: The areas off-screen where your character dies are known as the blast zones.  Blast zones differ depending on the stage.
  • Hitbox: Where a character’s moves hit. (Credit to Smashboards user Furil for the sweet visualization of Cloud’s Dair)

Cloud-Dair

  • Disjointed (Hitbox): A hitbox that extends beyond the character’s hurtbox (see below). Good examples are Marth’s sword, or Mewtwo’s tail.
  • Sweetspot/Sourspot: Most hitboxes have a spot where the move deals more damage and knockback. This is known as the Sweetspot. A Sourspot deals less damage and less knockback.  Sweetspots are good for killing, while Sweetspots are useful for comboing.
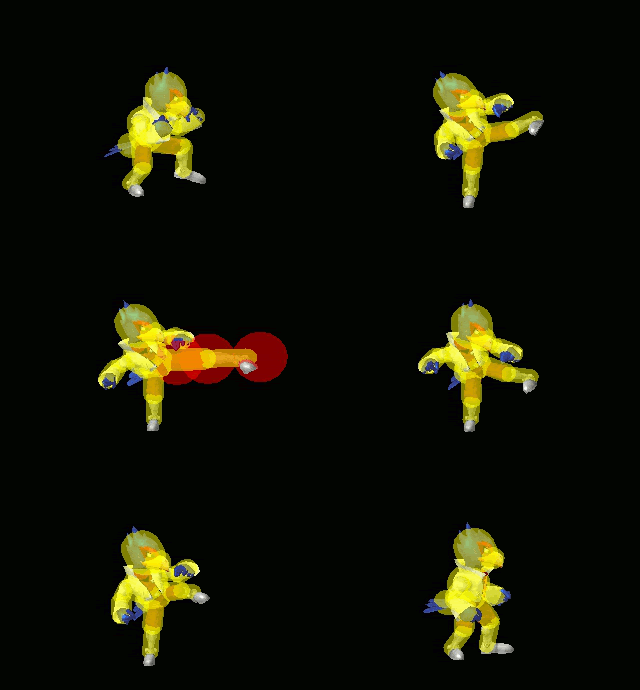
  • Hurtbox: Where a character can get hurt.  Using attacks and moving around changes the position and size your hurtboxes.  This is a GIF from Melee, however the principle still applies to Smash 4.  (Yellow represents the hurtbox, while red is the hitbox of Falco’s Jab Infinite)FalcoJabInfiniteMelee.gif
  • Hitstun: When a character is hit by an attack, there is a period of time where they cannot perform any action, this is known as hitstun.  They are put in a “tumbling”animation, however when the hitstun is over, they will still be in this tumble animation until an input is registered.
  • Tech: A Tech is preformed while in hitstun or during the Tumble Animation by pressing shield (L or R) as your character hits the ground or a wall.  Initially the timing may be difficult, but is a very good habit to get into.  Teching on-stage allows you to roll by adding a direction (Control Stick).  Helpful to escape combos and to survive stage spikes.
  • Shieldgrab: Pressing attack (A) while in shield (holding L or R) initiates a grab.  Use as a counter to a person attacking your shield. ShieldHit
  • Command Grab: A move that also grabs.  eg. Ganondorf, Mewtwo, or Diddy Kong’s Side-B.
  • Cooldown/Endlag: All moves have a period of time when they are finishing their animation, and often do not have an active hitbox for this time, thus making the character vulnerable.  This is the cooldown, or endlag of a move.  Some moves have longer cooldown than others, try not to use moves that have a lot of endlag unless you’re sure they will connect.
  • Punish: Taking advantage of an opponent’s mistake.  When an opponent uses a move that has a long cooldown, this is where you have a window of time to punish them for missing.
  • Approach: Getting closer to the opponent. Safely approaching is much more complicated, the safest approaches happen when you’re going for a punish.
  • Read: Knowing what your opponent is going to do before they do it, usually reads come from observations of play patterns a player repeats.  This goes both ways and is much more complicated than this simple explanation. But here is a GIF showing an attempt at a read.  Ike gets thrown up in the air, and sees Roy charging his Fsmash.  In an attempt to read Roy’s strike, he counters while falling.  The Roy patiently waits until his smash uses itself, and waits out the counter’s active frames.FsmashRead
  • Option: This goes hand in hand with reading. At any moment, you always have several options.  An easy way of looking at this is looking at the options someone has while in shield.  They can drop their shield, spot-dodge, roll left or right, or grab.  Often lower level players will resort to using the same options repeatedly.  eg: If an opponent is always rolling away when you run up on their shield, take note of that habit and next time you run up on their shield, anticipate their roll, and keep running to where the roll would end and punish.  Or, eg: If a player always spot-dodges when you approach their shield, run up and charge a smash attack that’ll hit them when their invulnerability runs out.  Again, a very brief explanation of this term.
  • Mixup: Changing the way you do various actions. Mixing up approaches, combos, and recovery are basic but essential adaptations to your playstyle. Otherwise, you’ll get too predictable.
  • DI (Directional Influence): Using the Control Stick to influence the trajectory you’re flying in. Can help you live longer, and can help you escape combos. I am working on a guide on how to correctly DI in the background.
  • Pressure: any action that forces a player to react.  Using projectiles a lot is a common way of pressuring the opponent to approach.  Shield Pressure is when you continuously attack someone’s shield, forcing them to choose an option, at risk of a shield break.
  • Spacing: positioning your character or placing your attacks in a way that keeps your character safe. Knowing the hitboxes of your moves and your opponents moves is crucial to learning how to properly space. Some characters rely on a heavy spacing game (Marth) moreso than other characters, but all characters must be conscious of spacing.
  • Zoning: using your attacks, or the potential threat of your attacks, to limit your opponent’s spacing options.
  • Neutral: the stage of the game where no character has the advantage, and players are usually looking for an opening either in the form of a punish or a read.  Mastering the neutral is one of the most difficult parts of the game.  Certain character have better options in neutral than others, usually in the form of projectiles.

Other Lingo

  • Johns: An excuse.  eg: Blaming a controller for your mistakes is known as “Controller Johns”.
  • SD: Self-Destruct
  • Misinput: Accidentally pressing the wrong button, or messing up the timing of a technique.
  • Sakurai: The lead developer of smash.  Often blamed for things.
  • There are so many other terms here and there that commentators use to reference moves, eg. “The People’s Elbow” for Captain Falcon’s Fsmash.  Someday I’ll provide a list of the one’s I’ve compiled, but for now – learn and observe!

Links/Sources

  • Furil’s Smashboards Hitbox Visualization Thread:  Not all characters have data yet, although Furil said he has plans to do more members of the cast when he has the time to.  Definitely a great resource.
  • This Kotaku Article by Yannick LeJacq: reference this to further understand the difference between Zoning and Spacing.
  • Kurogane Hammer: A fantastic reference containing all of the Frame Data for characters.


– parson